A Very Un-British Way to Build Climbing Anchors
This post is about how I think about anchors. Of course the placements need to be right, but this post will focus on how I equalise the gear and get the right position quickly and in my view, safely. It includes every tip and trick I know.
Disclaimer: These are my views, there may be mistakes, this is not intended to be a replacement for qualified instruction. Getting an anchor wrong can kill you and your climbing partners.
Why blog about climbing anchors?
I wanted to write this because I see a lot of “sub-optimal” anchors when out climbing, so it seems it's not as well understood as it should be. While writing this I looked back through old photos of climbing trips to find photos of anchors I'd made over the last decade and I'm ashamed to say quite a lot of my older ones were also sub-optimal. There are surprisingly few books or sites that discuss this topic. Libby Peters book and the VDiff site & eBook, I'd recommend. For more experienced climbers Andy Kirkpatrick has some good books that go into a lot of detail on different options, in particular “High” written with David Coley covers anchors well. But that's still not a lot of literature for such an important topic.
When we created multi-pitch.com, we wanted to promote the traditional ethic and make it more accessible, so I'm taking the plunge and writing about anchor building, a reasonably complex topic with catastrophic consequences in the event of failure.
The role of the belay... is to act as a secure anchor for the belayer to bring up the second, (holding both their weights), and then withstand a factor 2 fall onto the belay, achieved via the S.E.R.E.NE Standard.
S.E.R.E.NE
While I've never found the acronym itself a useful aid, it is never the less,
what everyone seems to teach. Anchors need to be 1. Strong, 2. Equalised, 3. Redundant, 4. Efficient,
5. Not Extend should one leg fail.
My main context is anchor building for multi-pitch climbing. An important point to note is no 2 situations are the same, and each variation can mean a different anchor set up is more suitable. Some key variations include: weight difference between climbers, strength / quality of rock, direction of previous and next pitch, type of protection, size of belay ledge, number of climbers in the party etc.
The “gold standard” traditional British climbing anchor
Photo: Rope anchor, using 3 bits of gear. The figure 8 tie in of each rope (blue and pink) is clove hitched to the outside pieces of gear. Then the pink rope has slack to a clove hitch on the middle gear (grey cam), which is then pulled down and clove hitched, to the green screwgate carabiner on the belay loop. All three bits of gear need to be equalised (equally tight). It's not ideal to have all the gear in the same feature of rock (the same crack), but sometimes there are no other options. More placements spread the load across more of the rock (hopefully) reducing the chance of it failing.

Traditionally, in Britain at least, climbers would use the rope to clove hitch 2 or 3 good bits of gear together with locking carabiners and belay up the second off the harness or sometimes the tie in loop of the rope (to reduce the chance of cross loading and ensuring direct weighting of the anchor). This is strong, redundant and dynamic (the rope stretches and reduces load on the gear). It doesn't really get much better than that but I rarely use this set up because:
1. It requires extra locking carabiniers. This is because using snapgates for a clove hitch has a risk of the hitch coming undone if the carabiner rotates. Some climbers accept this risk and it's common to see clove hitches with snapgates, but it makes me uneasy so I don't do it, especially because the failure scenario is significant here (gear/anchor failure).2. It can be quite slower to build. This is particularly true if I want a master point on it as well, for example if climbing in a group of 3 or more and / or using guide mode to belay. I use guide mode to belay as much as possible for a more comfortable belay. Belaying off the harness can be quite tiring on long routes, and if the stance is awkward I end up feeling stiff from belaying. Guide mode also has the extra safety of (mostly) auto locking in the event of a fall.
3. It needs at least a few meters of spare rope. Not a major issue, but it means I can't climb right to the end of the rope length, or if I do, I have to climb back at least a little way. I'm also sometimes suffering from some rope drag at the point of making an anchor, so having to pull extra rope in can be annoying.
4. If an anchor uses 4 or more bits of gear, it exacerbates all the above points. I quite like 4+ point anchors. I think they are important if I'm unsure of the rock, I'm using some marginal gear (like brass wires), or if the pull direction could vary the event of a fall from the second or when they lead the next pitch (eg a diagonal route). In an ideal world the gear would all be amazing, but on adventurous routes for example, you don't always have perfect placement positions. Also the research paper in the references at the end highlights, on average, 4 point anchors reduce the load on the highest loaded leg vs 3 point anchors, so theoretically much less likely to suffer cascading failure (failure of one, loads the next with greater force leading to failure, and so on).
5. Escaping the anchor is harder. Unless I create a master point as well (see below), escaping the anchor to assist the second (or leader) in an emergency scenario is harder. For me this isn't a major concern because the chance of needing to abseil down to the second would require an exceptional emergency, and if that happened the extra few minutes of faff would be the least of my worries. That said, if climbing in a dangerous situation, it may be a relevant consideration.
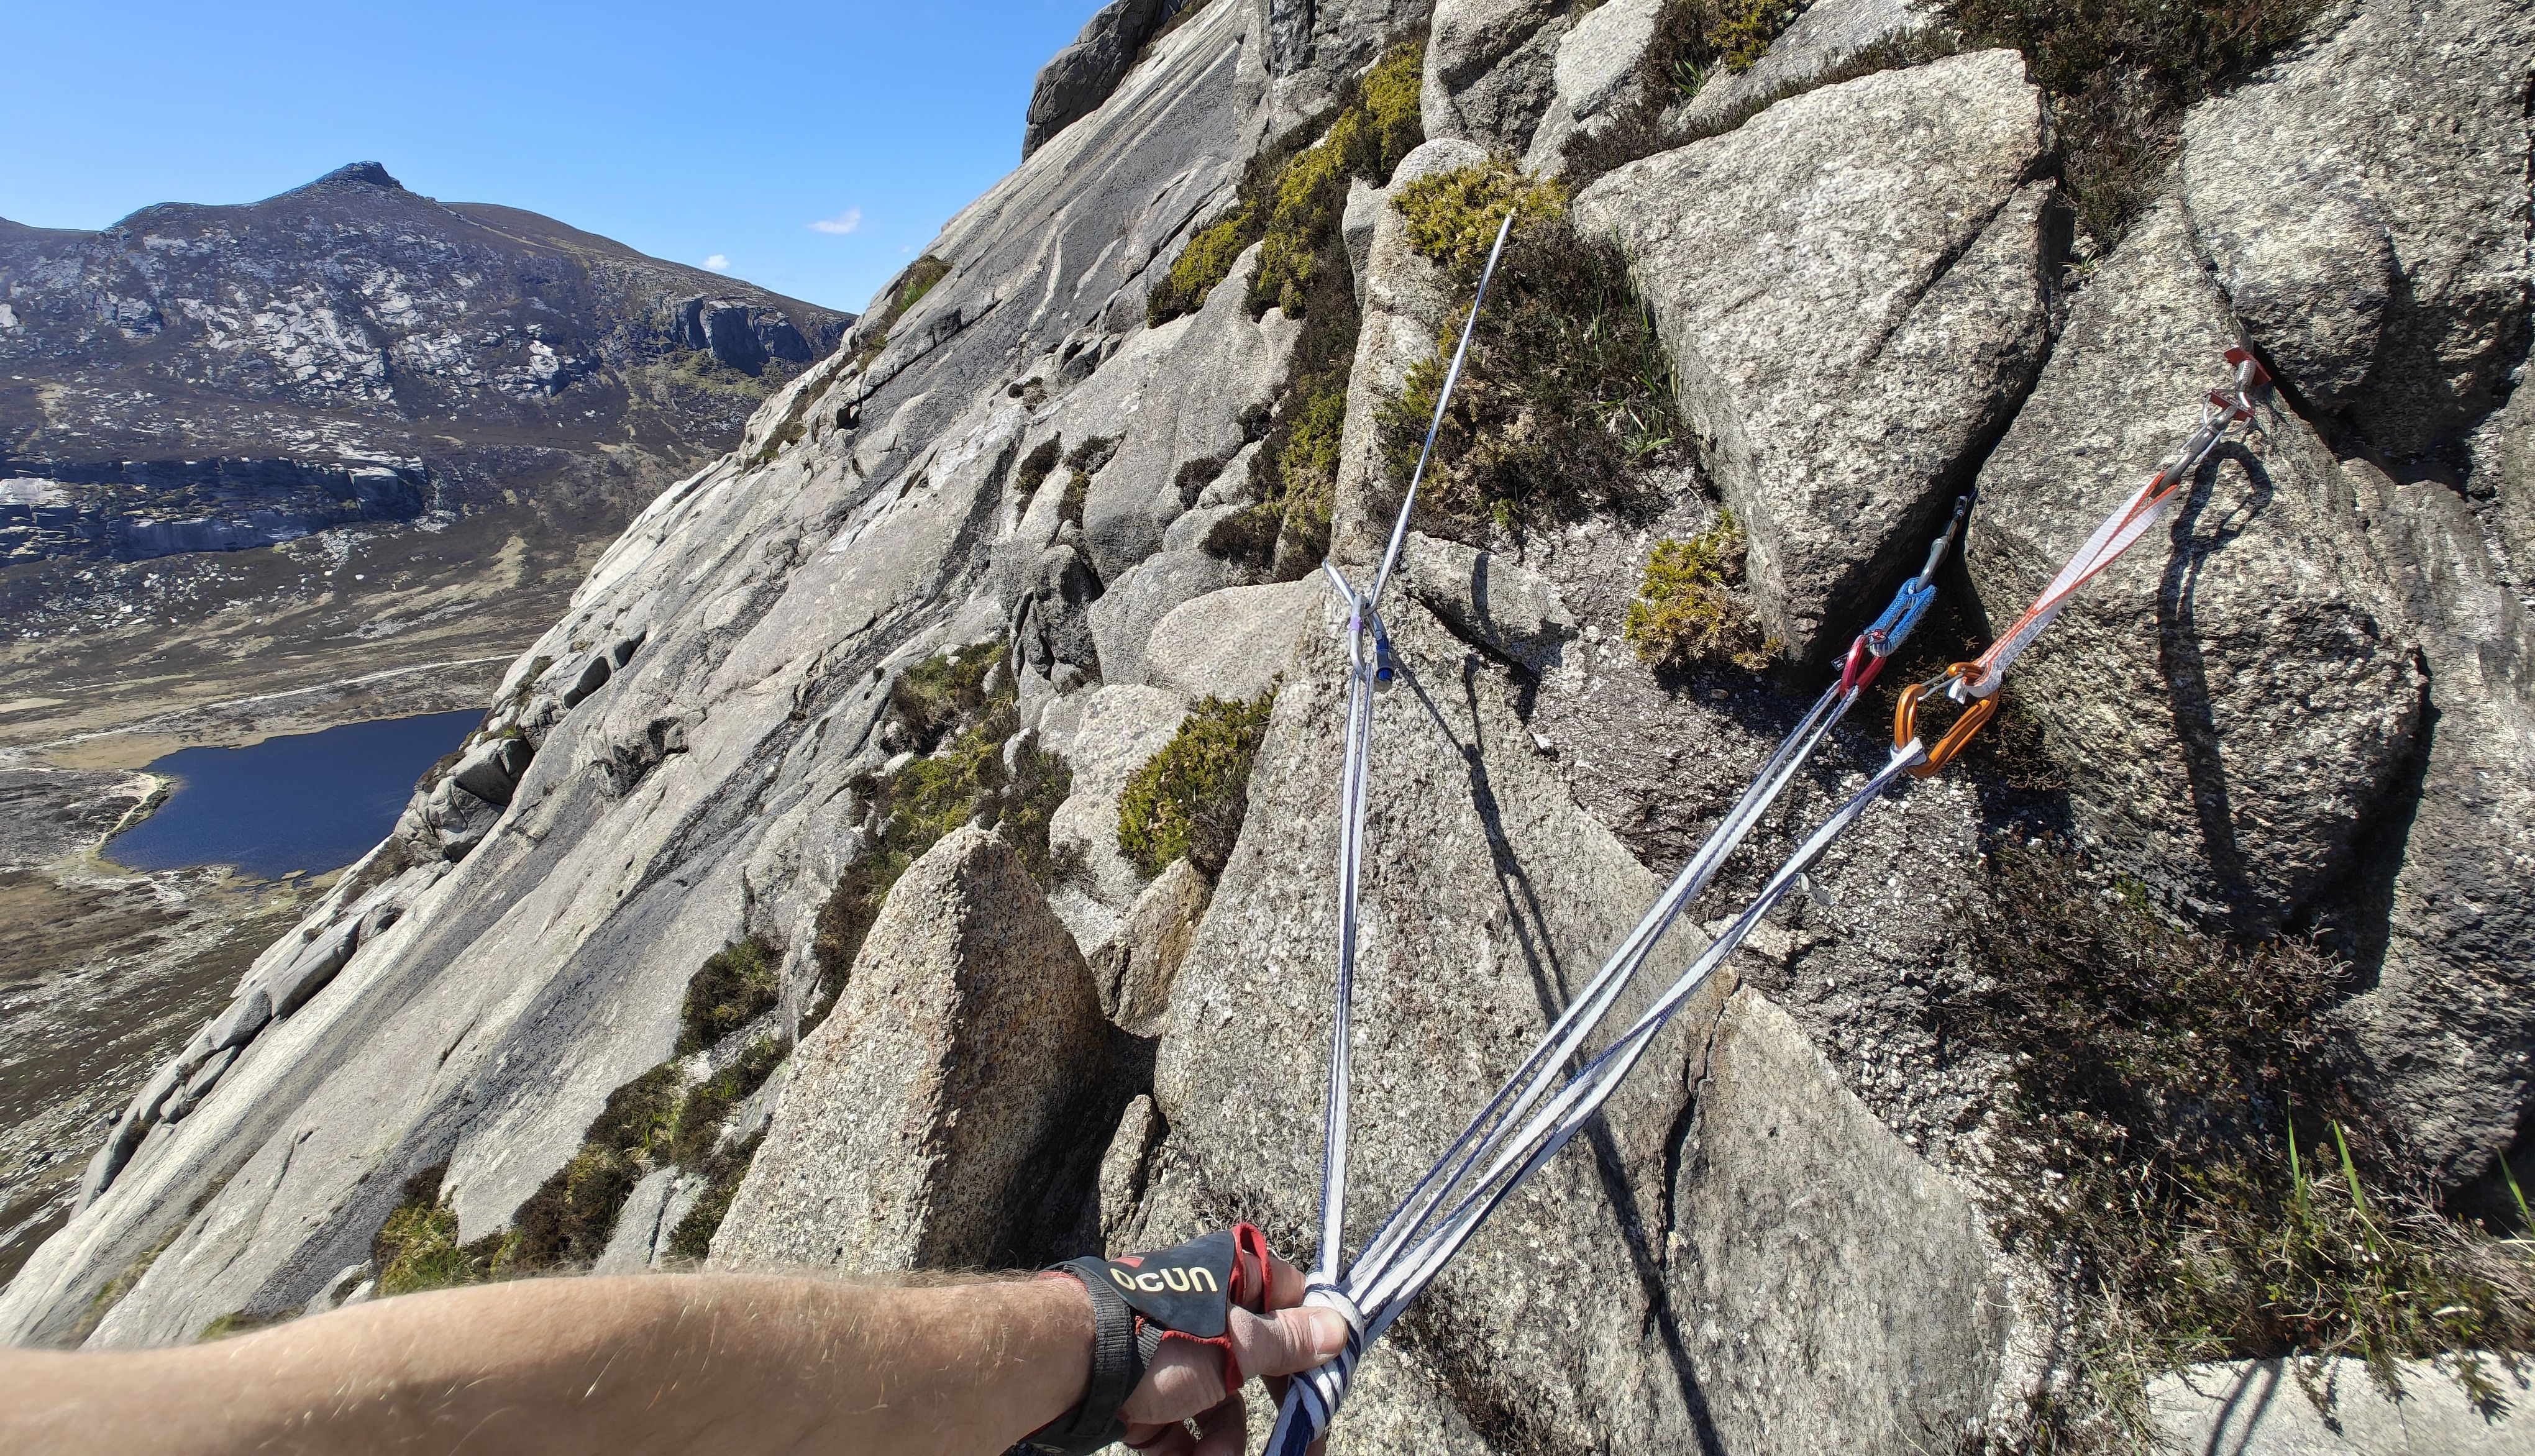
Rope anchor with a master point (for overachievers)
Photo: A rope based 3 point anchor in granite with a master point set up to belay in guide mode. The extra step compared to the above belay is that the slack rope between 2 bits of gear (on the blue rope this time), is clove hitched to a master point carabiner (green screw gate), then the dead end of the pink, is also cloved hitched to the master point. These additional 3 strands also need to be equalised i.e. both the master point (green carabiner) and belayer (me with grey screwgate on my belay loop + 2 ties in knots) are equalised independently.

This is a great set up, but I find I'm a bit too slow building it to want to make it that often and again it needs lots of locking carabiners (6+) and a fair amount of spare rope. It also requires you to navigate extra overlapping planes. The masterpoint (Green Screw Gate) needs to either be behind the rope going to the harness (most sensible) or the whole thing needs to be in front, if the climber is coming from quite far back (maybe a slab or a ledge behind). In this photo I have crossed over the front of the middle protection point which is not ideal for neatness (I'm not an overachiever after all), but it shouldn't materially impact the performance of this anchor.
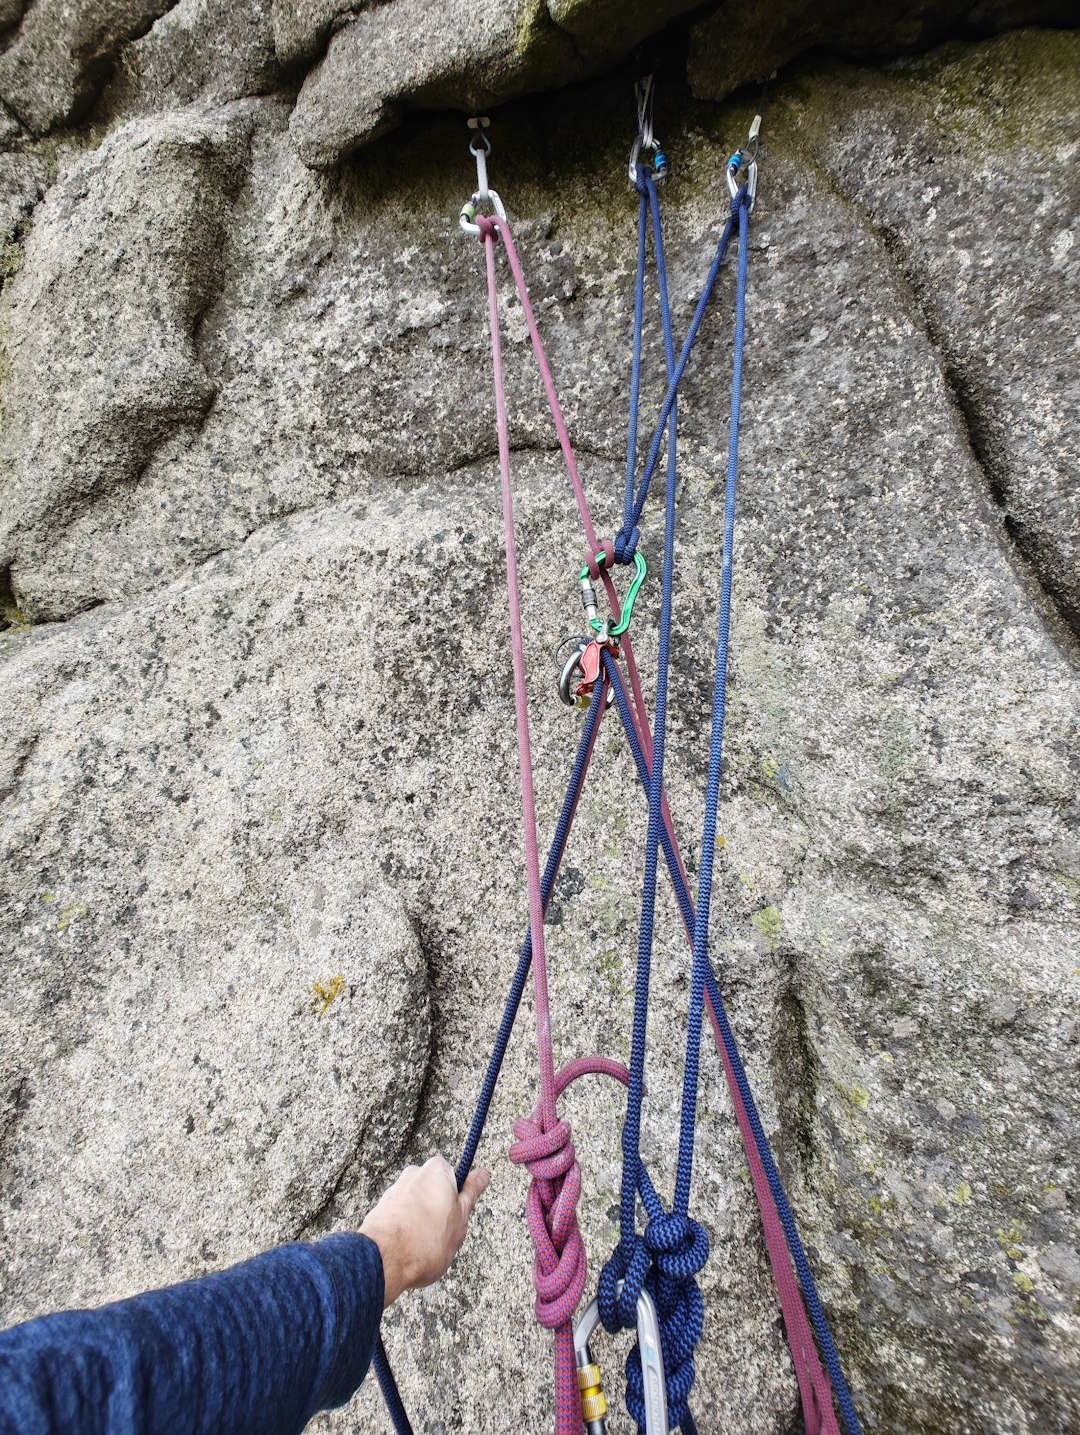
My preferred alternative: Big sling based, master point
Photo: A sling based, 3 point anchor with a master point set up to belay in guide mode. The belayer is attached using a personal anchor (PAS) clipped into the shelf of the master point. In this image a 240cm sling has been clipped to each piece of gear, then the sling between the gear is pulled down to meet the outside loop and together and tied in an overhand knot.

My starting point when building an anchor is instead to use a large sling, to create what's called a master point. Something more common in America or Europe. There are of course pros and cons of different set ups and I do alternate what I use for each anchor but this is my “go to”. I find it a bit faster, it needs less screwgates and it means you can often belay in guide mode (unless the anchor position is too far away or too low). The rest of the climbing party can also clip in with ease at the belay point (reunion) to eat, drink, chat, talk about how scary the last pitch was or which direction the next goes, as well as exchange gear etc.
The Anatomy of the Anchor
The Knot: This is typically an overhand, but figure 8 or other options are also fine.
The Master Point: The strongest point that spreads load across the gear.
The Shelf: An additional redundant, equalised and secure point to clip into,
typically for other climbers or to keep things neat. When using the shelf, the carabiner has to go though the
middle of each leg in the sling so it's redundant and equalised. I always do a buddy check when
the second clips in here, as they may not understand the setup as easily / quickly as the person who
made it (me).
The Spread Angle: The angle between the furthest apart pieces of gear determines how
well the load is spread across each bit of gear. For 2 point anchors, this should be less than 90 degrees.
Wider angles mean the load on the gear is greater. However this does not apply to multi-point (i.e. 3+)
anchors as the load behaves differently. See references after the conclusion.
The Direction of Pull: How the anchor is expected to be loaded if the climber falls.
It's all about slings
By default I carry a 400cm and 240cm closed loop Dyneema (also called Dynatec or Spectra) pair of slings. This enables me to lash 3 or more bits of gear together pretty easily in an equalised way. 240cm is good for 3 bits of gear and the 400cm sling is good for 4 or more bits. Either can also be used to tie around large boulders, thick trees or fallen / wedged blocks. The 400cm one in particular, can play double duty as protection round a block, tied off with a knot and joined to extra bits of gear in an equalised way, all with the same sling. In addition the longer sling means you are more likely to have a “spread angle” lower than 90 degrees. The 2 slings weigh 193g combined (120g and 73g respectively). For comparison a large HMS screwgate is typically just under 100g. (Fun fact HMS is short for the german compound word Halbmastwurfssicherung, which means something like half mast throw protection, which is how the “munter hitch” is described.)
Before the 90s this technique would have typically used a cordlette of rope or a Nylon sling. Some people still use cordlettes today (especially in the US). Either option would be a lot heavier (just over double the weight using 7mm rope) and, importantly, the knot securing multiple bits of gear can be incredibly bulky. However these materials do stretch more which has advantages and disadvantages (covered later).
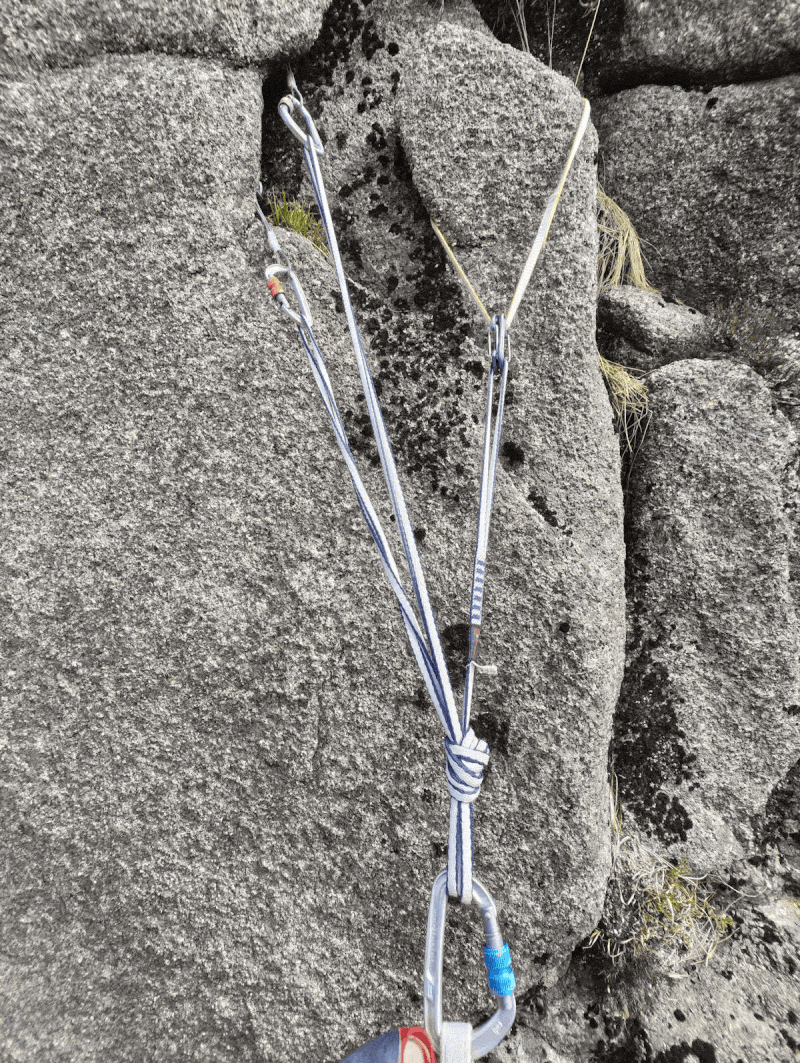
Making a sling go further (with serious downsides)
One trick to make a sling go further (although with some serious downsides), is to clove hitch two adjacent bits of gear in a 3+ point anchor. This means each still supports the master point but less sling is used. This does mean the shelf is less secure, so it shouldn't be used for anything serious like belaying, because it's just relying on the double strand gear. This also means I should really be using screwgates for the clove hitches, although the failure scenario for clove hitching a sling to snapgates is different to using the rope because the sling is a closed loop. It's also possible to girth hitch the master point screw gate carabiner to, once again, save using as much sling. Girth hitching the master point carabiner does mean the master point is not redundant, i.e. if any leg of the sling gets cut through abrasion on the rock or by a falling rock (for example) it will compromise the whole anchor. Because I carry a 400cm sling I never need to use either of these techniques.

Photo: A sling based 3 point anchor with a master point, where the purple edged sling is clove hitched to two adjacent bits of gear to save using as much of the sling. The master point is also girth hitched to the screw gate carabiner as well because tying a knot in the sling would be hard with the remaining length.
Troubleshooting Anchors
Pull direction
The first general issue for a rope or sling based anchor, is getting the gear to work for the direction of pull. Most of the time this is easy and you can just pull the sling together in the right direction (towards the last bit of gear) before tying the knot. However, traverses can be tricky because if gear is in when the climber falls, the pull is different (horizontal) vs if they fall after the last bit of gear (or before the first) and swing down below the anchor. In addition if two climbers are on a traverse and one falls with gear and one without; the pull direction will be different for each climber. In this scenario a guide mode belay wont auto lock and the forces are significant. Side note, this is one of the reasons we have "Traverse Required" as an advanced filter on multi-pitch.com. Traversing has extra complexity and risk for both the leader and second.
One way to make the anchor spread load more effectively is to use a sliding X, or quad knotted anchor. However these add considerable complexity to the set up (if using lots of gear for the anchor). I've only used a “quad” when setting up a top rope solo climb (a very different topic). One of the reasons I shun the 2 point anchors in some of the above mentioned books is because awkward angled falls can make some of the gear less effective.
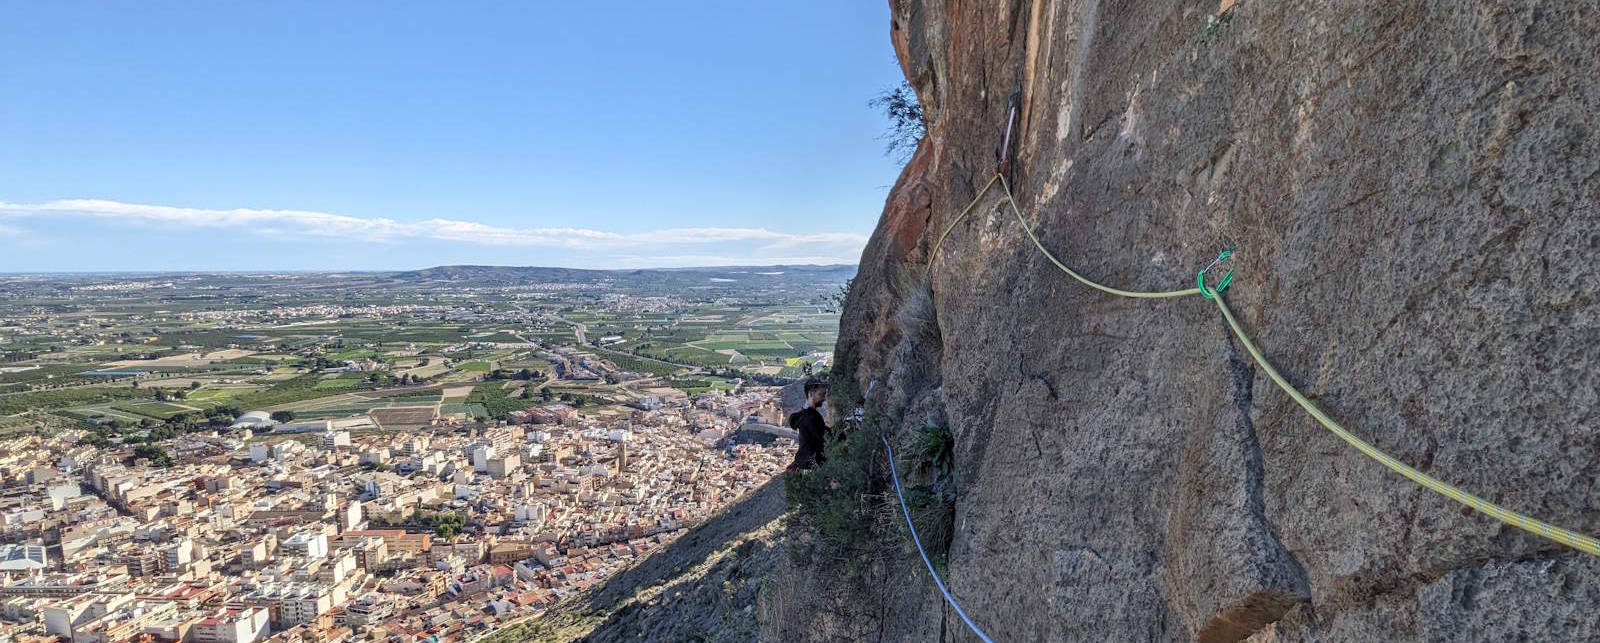
Photo: When we tried and failed to find an old, de-listed trad route in Costa Blanca, we decided to back off rather than aid through. We had to then traverse across to an abseil station. The climbing was okay but delicate, the gear however was very poor, taking the smallest brass wire I own (orange quickdraw) and a cam in a less than ideal flake (green carabina). If Michel fell (not much chance in all honesty), the pull on the anchor would be either: sideways if the gear held, or down (and very forcefull) if the gear broke and / or the rock blew.
Is it safe to use snapgages for the anchor gear?
This is a choice climbers have to make for themselves. Mostly I do use snapgates on the cams and add quickdraws to nuts. The risk is, if the gate is pressed against the rock, it could open (even slightly). An open carabiner is much weaker than closed. There is of course also the risk the sling could slip out. Firstly I make sure the gates face away from the rock and the anchor is kept taught and so there is little risk in my view. If I'm unsure, or can't extend the gate away from the rock for some reason, I use screwgates or 2 opposing snap gates. That all said, when taking pictures for this post I've used more screwgates than I normally would.
Photo: Double snap gates on a limestone thread.

Shock Absorption and Load Distribution
The first issue is that Dyneema doesn't really stretch. This means there is little/no shock absorption from the anchor (although the rope is still dynamic for climbing falls). Therefore falling off the belay ledge when just using a personal tether would be a hard shock to the anchor (and it could fail), if you fall from above the anchor onto it, this can be catastrophic (search Grand Capucin fatality in 2007, or watch the DMM video in the references at the end). A common rule is to never have your waist above the masterpoint unless you are on dynamic rope (i.e. leading). Cordletts of rope and nylon slings have more stretch but are bulkier and weigh more (and also don't mitigate the above risk) so I stick to Dyneema and the rule of keeping the anchor above waist height. I also typically use a dynamic personal anchor (PAS) to tether, which means if I fall off the belay ledge, their is some shock absorption.
Another issue related to the lack of stretch, is that the load may not be well distributed unless the anchor is perfectly equalised. This can be tricky as even 0.5cm of slack will mean a piece of gear takes no load until the others break. One trick I use here is to loop the sling round the carabiner of the strand that is slightly slack, until it becomes tighter (if it's way off, I re-do the equalisation knot).
Interestingly if one leg of an anchor is much longer when using a dynamic material like Nylon or the rope, this can be an issue because the extra material on the longer leg stretches more, and so the gear on the longer leg takes much less load. Dyneema has an advantage here. However the challenge of spreading the load evenly across multiple points is significant with Dyneema. Overachievers may wish to shorten the lengths of longer legs with Dyneema, before using a rope or cordlette to make the anchor. I'm not an overachiever.

Extending the anchor means extra steps
I still need to use the rope if I want to extend a sling based master point. In the event the anchor is set back, then I need to adopt some of the techniques from traditional rope based anchor, i.e. run the rope from my tie in, through the masterpoint and back to my harness attaching it with a clove hitch on a screwgate. In this use case the rope is extended to the point I want to belay from.
This photo is from a route at Lower cove in the Mournes that has a large heather shelf between the two pitches. I wanted to belay from the edge, but the anchor needed to be set back on the next face. It has a 4 point sling based anchor with a master point, but the rope is extended to the belay position and attached back to the belay loop with a clove hitch on a screwgate.

The knot weakens the maximum strength of the sling:
When a climber ties a knot in a sling it roughly halves its strength. So a 22kn sling would theoretically break at 11Kn. However when you double up the sling you double its strength. Break tests show a 3 point sling anchor as described here would hold around 20Kn. A pretty big lead fall can be around 7Kn although many falls are less. Climbing protection is typically considered full strength at 12Kn so the knot reducing strength is of little concern for me. However older slings (especially ones that have had UV degradation from the sun) break at much lower impacts, so replacing soft goods regularly is important. Most manufacturers give a maximum lifespan of 10 years ( DMM advice ) and have the date of manufacture printed on the label (often in an obscure way).
The sewn bar gets in the way of the knot
When I pull the sling into a point ready to knot it, the sewn bar can get in the way and make it difficult to tie a clean knot. The solution to this is to clove hitch the sling near the sewn bar to sit next to a bit of gear and out of the way. The same technique applies if using a cordlette, the knot that creates the cordlette loop can be hitched out of the way.
Photo: The sewn bar of the sling is clove hitched to the carabiner of a piece of gear, to get it out of the way, so its easy to equalise the anchor and tie the knot.

Some Real Rock Climbing Anchor Examples


What about bolts?
A smaller 120cm sling, or the 240cm doubled up can be clipped to 2 bolts to make an anchor if I trust both bolts. If I have any concerns about the bolts, I back them up with 1 or more bits of gear and treat it like a normal trad anchor. There are multiple shocking (fatal) cases of bolt anchors failing, even when under minimal load from just lowering a climber (Blue Mountains 2009, Leonidio 2019 and Kalymnos 2026), so if in doubt I back it up. This is especially important with old bolts, on sea cliffs (where corrosion happens fast), or different / badly placed & unsafe bolts.
The PAS (personal anchor system) option on bolts: When I trust the bolts and want to belay off the harness I occasionally just clip different loops of a PAS to each bolt then belay off the harness. Only one bolt will take the load so it's not equalised but it is redundant. I don't typically use this despite always wearing a PAS, but have done when speed is important and the bolts are shiny and new and I'm on a good ledge.
What about monolith belays? (trees, boulders or rock spikes?)
Photo: A monolith belay using a boulder of rock. A very quick way to build a belay. More than good enough for bringing up a second at the end of a climb.

Often climbers will use just a large tree or wedged boulder or large spike of rock for the anchor. Some people call this a monolith belay. The advantage is it's very quick to either tie a sling around the monolith and make a master point or even tie the rope around it and clove hitch it back to the harness.
Trees
The risk with a tree is that it's not necessarily well rooted in rock. However if it's wider than the base of your helmet and it's alive, then it's probably strong enough (this is the rough rule mountain rescue teams often follow). The wind will blow down anything very weak. Keeping the anchor as low as possible on the tree will also reduce leverage and make the anchor stronger. If in doubt, back it up with another tree or rock or gear placement.
Spikes
The risk with using a spike is firstly will the sling lift off? Secondly is the spike strong enough. Again, positioning the sling or rope on the lowest widest part will help. If I'm in doubt, I back it up. An extra consideration for spikes and boulders being used as a monolith belay are the knots. The knot halves the strength for the sling and unlike a 2+ point anchor the sling isn't doubled up so the strength of the anchor may be 11 kN or less (especially lower with older slings). This is probably fine for bringing up a second but riskier in a multipitch scenario with high fall factor potential.
Boulders
The tops of crags are often filled with strewn boulders that can make strong anchors. Unlike a spike a boulder is loose so it needs to be solid to the ground rather than balanced in a way that could cause it to tip. As a general rule 1 cubic meter of rock weighs around 2 tons (more for granite and heavier rock) and so, if well set and not delicately balanced, can hold a lot of force. 2 tons would counterbalance around 20 kN. Again if I'm in doubt, I back it up.
Conclusion
I get a lot of enjoyment from the mental, problem solving, aspect of climbing. I take pride in climbing in a way that I believe is safe. The above anchors are just the methods I use, and by no means an extensive or correct list of anchor options.
One key factor in safety is having a “standard operating procedure” for anchors. I.e. a very clear, well understood and well practiced, go to option for making an anchor. For me the sling based master point is that option, because I often climb with more than one person, so I prefer a master point and I like the efficiency and ease of a guide mode belay. If I picked the absolute best anchor for each scenario I would use the rope more, but there is something to be said for having a quick well understood and versatile strong anchor option, when you're tired and 10 pitches into a long day of climbing.
To put it another way, there are no scenarios where a sling based anchor is not going to be good enough (at least as the basis of the anchor). There are however times when a rope based anchor is impractical (e.g. I need to equalise 5 bits of gear), or not possible (not enough spare rope).
Feedback, comments and corrections welcome via email to multi-pitch@outlook.com.
References